Today is mushroom day. Not “a” mushroom day, the kind that’s dark and dank and often rooted in excrement, but a day for preparation.
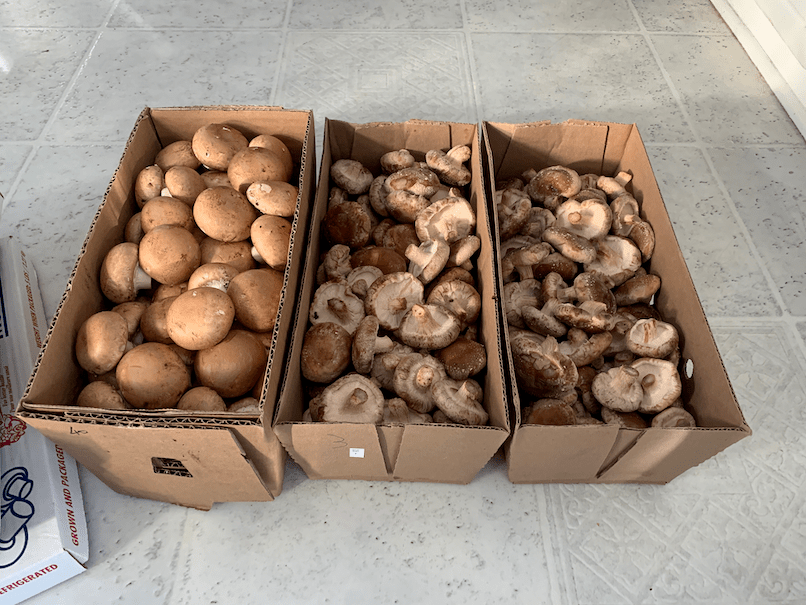
Literally. Today we picked up 11 pounds of mushrooms from the good folks at Carleton Mushroom and I’m going to spend the next hour or so getting them cooked and into my freezer.
That’s six pounds of shiitakes and five pounds of cafe mushrooms. I’ll need to rinse, trim, cut and roast them, then let them cool before putting them in the freezer.
(Ok, I know what you’re thinking: That’s going to take longer than an hour. Like, way longer. You’re probably right:)
It’s worth it. Once they’re cooked, you can use them in many ways, and the shiitake taste like bacon.
Serious Eats has an article about this that’s helpful, but it’s a straightforward process. Here’s my stripped-down version:*
slice mushrooms, toss with olive oil, salt and pepper
bake at 400F for ~45 minutes (30 to 60 minutes, really, depending on the mushroom; the shiitake dry out faster, so keep an eye on them, but also they are delicious when mostly crispy)
for stock: while the caps are roasting, chop and sauté any leftover stems with oil, salt and pepper, then add a couple of bay leaves and a whack-load of water and simmer on low until reduced by ~half or you get sick of waiting.
This is a shot from the last time I did this, with oyster and shiitake mushrooms.
In the end, we’ll have bags of frozen mushrooms ready for use plus stock from the stems.** (Stock is more more work to simmer down, then strain and freeze, but I hate wasting all those stems plus the result was worth it last time so I’ll do it again.)
Maybe I’ll finish in time to get down into the workshop (what? I like wishful thinking), but even if I don’t I’ll consider the afternoon well spent. And the next time future me is looking for a flavor boost for dinner or a quick addition to soup, pasta, rice, dumplings, or pizza, I’ll be glad I did.
* * *
* I’m not commercial kitchen level by any means, where cooks make an art of mise en place, but I do like being at least a little prepared. I’m more about shortcuts that take the pressure off and not opening a vegetable drawer to see nasty puddles of slime where mushrooms used to be. Because ew.
** The freezer tends to have bags of things like cubes of frozen spinach, tabouli, leftover lentils and rice, plus frozen citrus juice, chopped scallions, and whatever else I can think of to make life easier when the day’s been long and dinner seems like an insurmountable challenge. When I can make time for this, I’m happy I did. Whatever works for you? Do that.
Mr. Man’s mechanic dropped him a text the other day, mentioning that he now had a new location and was ready for business, and to come on down whenever he needed work. He sent along Happy New Year’s wishes for Mr. Man and (here’s the fun part) The Brownie Lady. That’s me:)
Quick bit of info: We spent a considerable amount of time in Cambridge, Massachusetts and also listening to the much-loved Car Talk. Along with the many (many) jokes and bits of car advice, Tom and Ray also devoted a lot of time recommending customers bring their mechanics brownies.
Self-interested? Sure. But if the mechanic’s happiness is indeed equated with customer happiness, doesn’t everyone win? I decided to find out.
I’ve shared my brownie recipe here before. It’s quick, easy to whip up at almost any time, and good. I like it, Mr. Man likes it, and it turns out our mechanic likes it. Not that he wouldn’t have done a good job without added incentive, but does he do it faster than he might otherwise? Maybe. And who doesn’t like to feel appreciated? Win win win.
I don’t know if the mechanic knows my name, but he associates me with chocolate and kindness, and remembers that I cared enough to send him a treat. I like that.
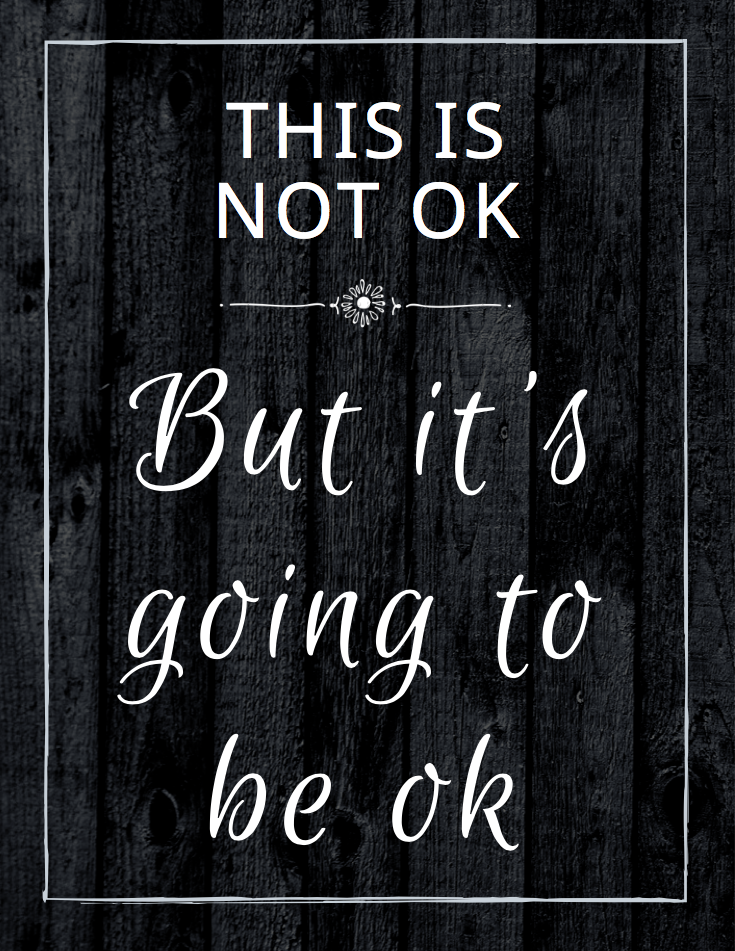
It’s been a while, but let’s just chalk that up to 2020 and move on, shall we?
Speaking of, it’s been a year, hasn’t it? We haven’t seen friends, family, or done anything more exciting than rescue feral kittens in months.*
Like so many of you, I miss my family. I miss my friends. I miss not knowing the latest hot news in epidemiology;)
I wanted to write about how things were going. I wanted to write something encouraging. I wanted to write, period.
But.
I just didn’t have it in me. And sometimes that just has to be ok. So I worked, managed and generally tried to keep my fashizzma together while the world did 2020.
I haven’t been writing. I haven’t been to the workshop. My sewing machine crapped out on me. I have been reading, at first to study a couple of new genres I wanted to understand from a writer’s perspective, but then I just wanted happy endings.
You know, those things that used to be a luxury but now feel like a necessity. At least to me.
But I’m slowly coming out of it. Fall is sliding into the cold sleep of winter but paradoxically, I’m waking up.
I had a story idea the other day. It wasn’t all that good, but whatever. Thank you, brain.
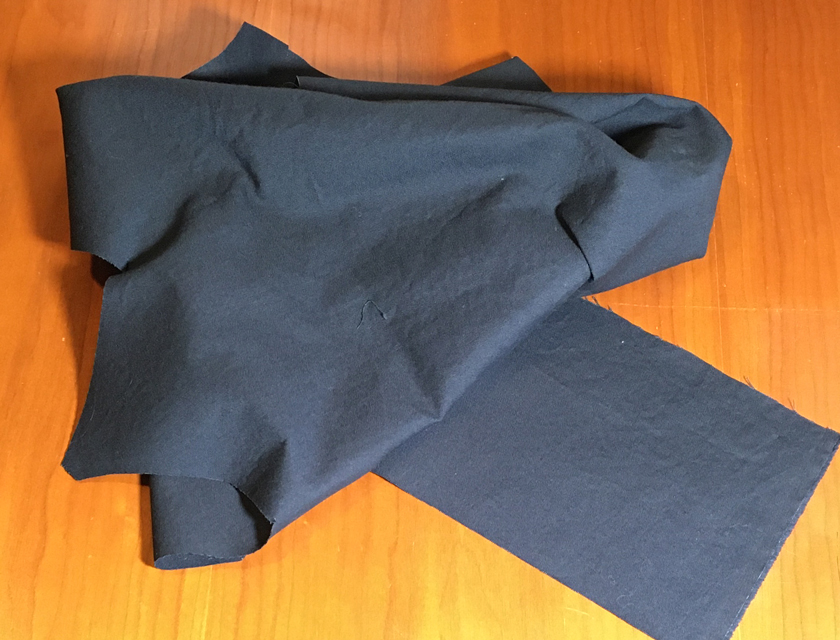
I’m also doing what a lot of people are doing. Buckling down, cooking, making masks, the quintessential pandemic pastimes.
And I had the urge to share. So I’m here today to share my favorite DIY mask pattern.
* * *
Mask Talk
Despite dramatic progress on the scientific front, we don’t have as many tools in the fight against Covid-19 as we’d like (I know, stating the obvious). What we can do, right now, is socially distance, wash our hands, and wear masks. Why masks? Check out this cool NYT interactive or this handy explainer to see why masks are effective.
Short answer, breathing other people’s spooge is nasty. Masks help.
There are a lot of ways to buy masks these days, and it’s certainly possible to find a variety of options for sale. But if you, like me, enjoy being able to customize your style, size and fabric, then this pattern may be for you.
In the early days of the pandemic a lot of civic-minded makers designed and shared mask patterns. One of the best I found for me and Mr. Man (whose face has a striking set of cheekbones), was this pattern by Tom Bihn (check out the videos and notes).
I’m sure I’m not alone in the search for a mask that fits my face, is comfortable and also effective. For me and Mr. Man, the Tom Bihn design is that mask. This spring, the company was agile enough to add mask production to their line, but also generous enough to share the pattern.
I like the shape and structure of that mask, but wanted a filter. The modifications Rachel posted are helpful, but I realized that the top seam was too thick for me. It added more bulk than was comfortable and all that fabric didn’t quite shape to my face.
Was that something I could fix? It was. Would Tom Bihn be open to me sharing this new version? Yes!
* * *
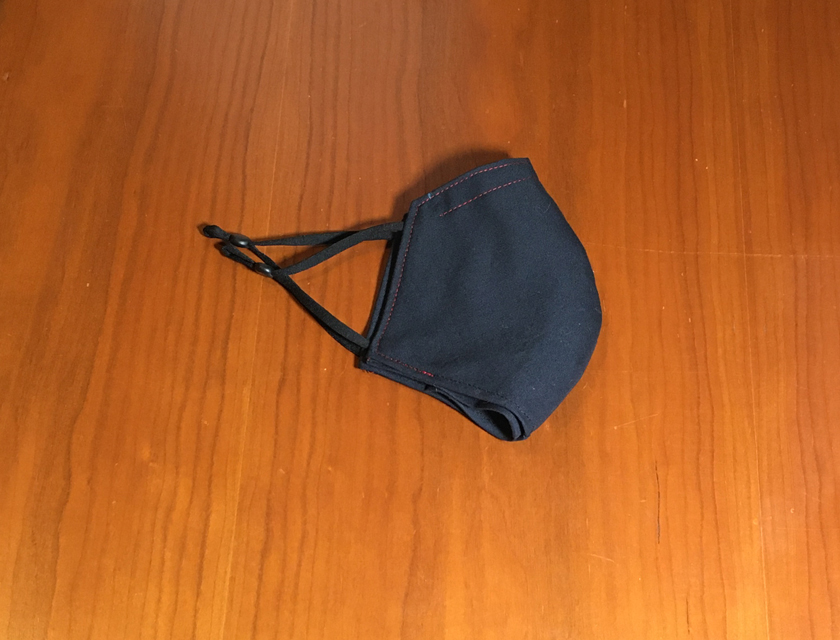
The TBv3+ (Cue Rainbows and Dramatic Music!)
I give you my modified mask pattern, the TBv3+ with a flat top seam and bottom filter pocket.**
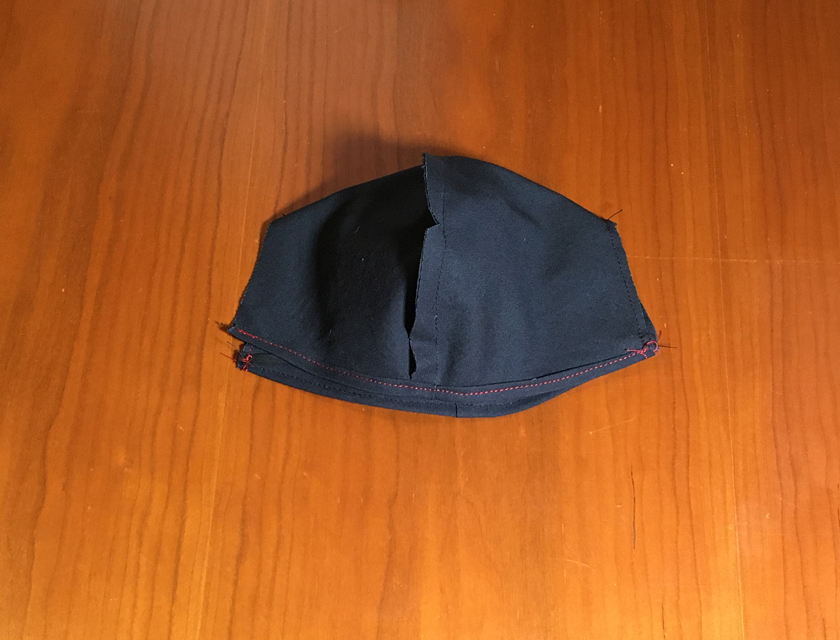
I’ve streamlined the process a bit from my first versions, so hopefully the pattern will be relatively straightforward. I’m not set up for sewing videos but here are some photos to help you get started!
And we begin!
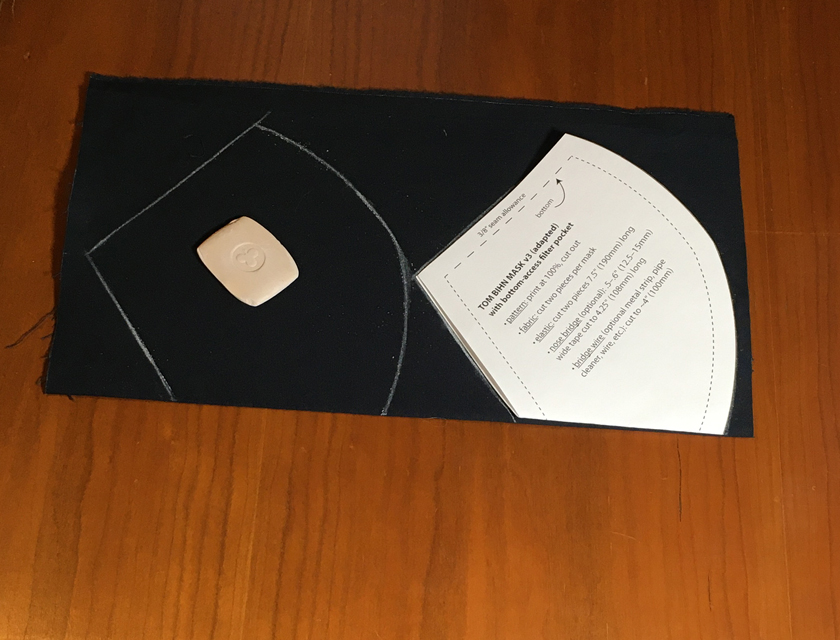
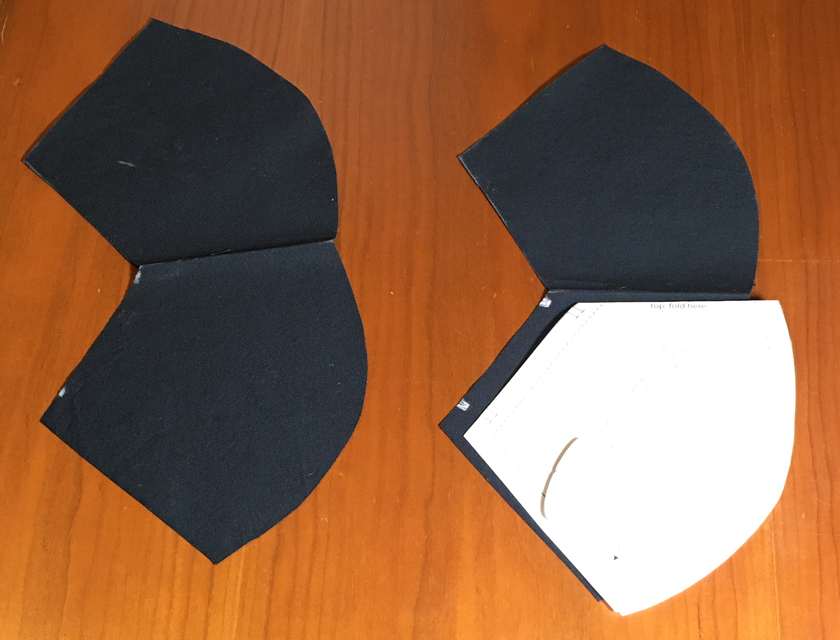
print & cut out pattern, fold it & fabric in half, trace pattern
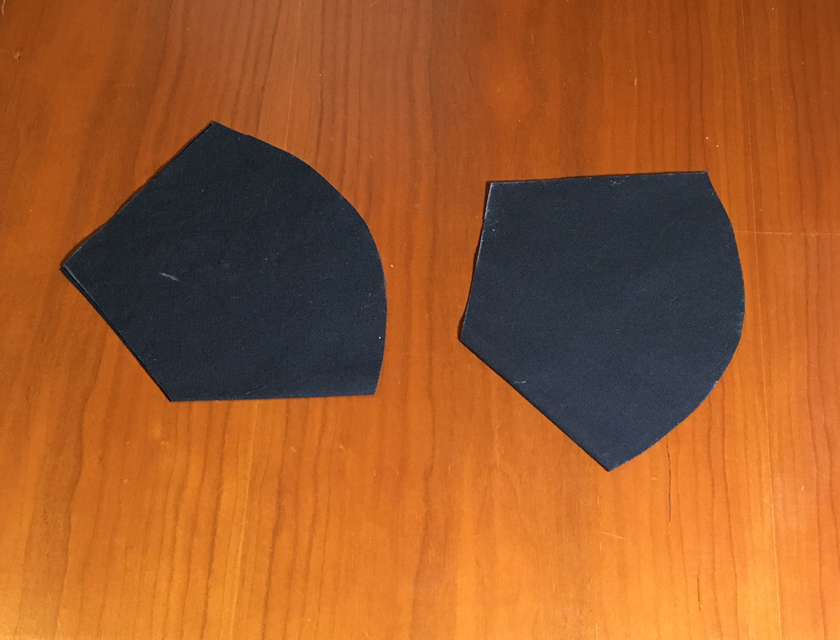
cut out two pieces
looks good, right?
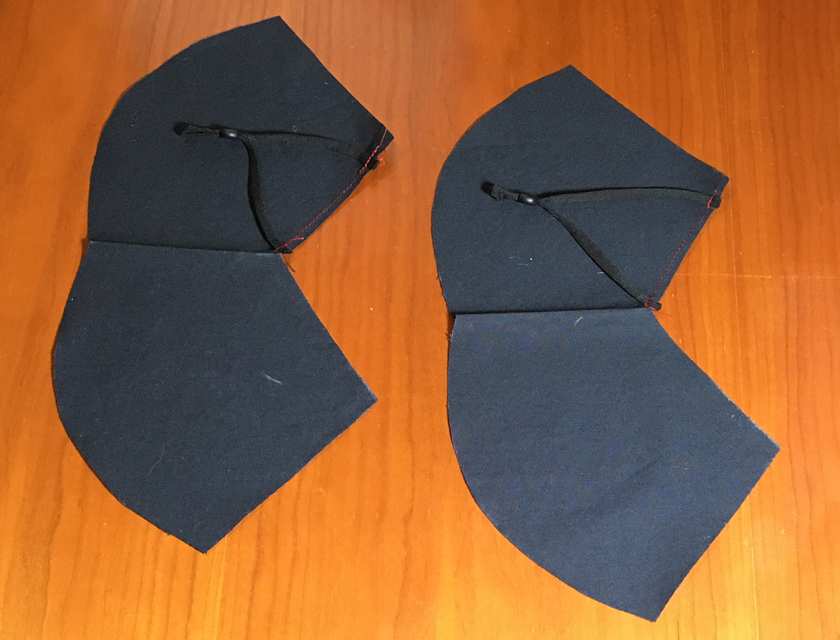
mark elastic anchor points
find pesky elastic
attach elastic
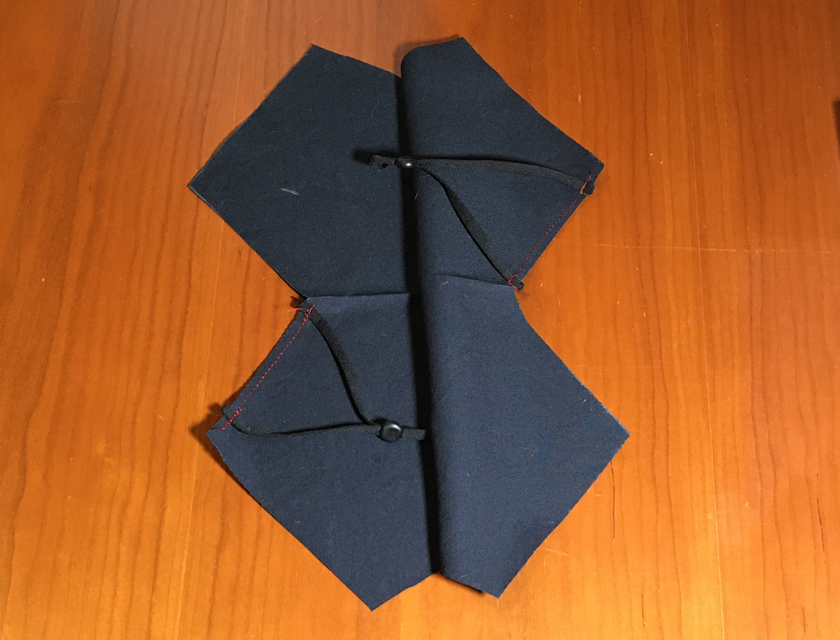
align pieces
pair, with elastic inside
come on baby, hold together!
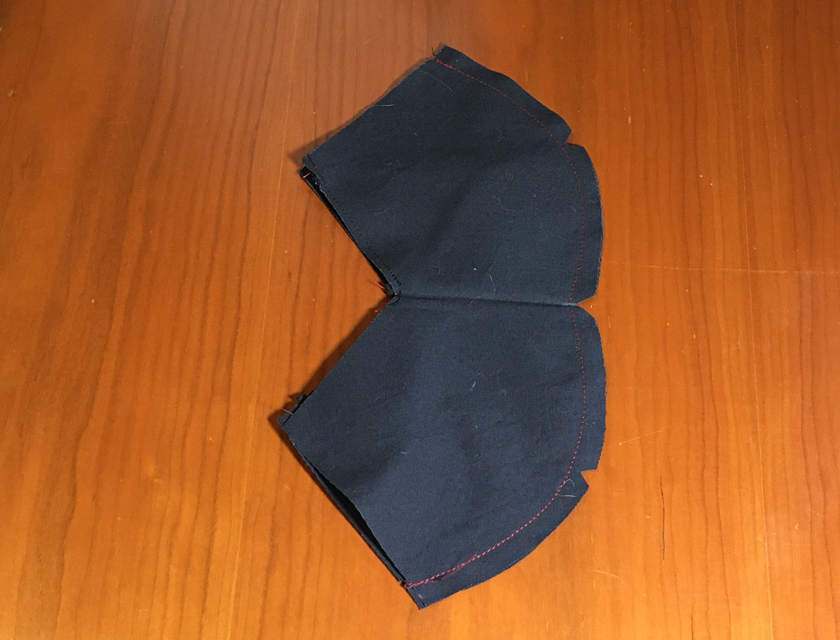
sew sides together
clip seam
hem bottom edges
stitch sides
invert; almost there!
top stitch
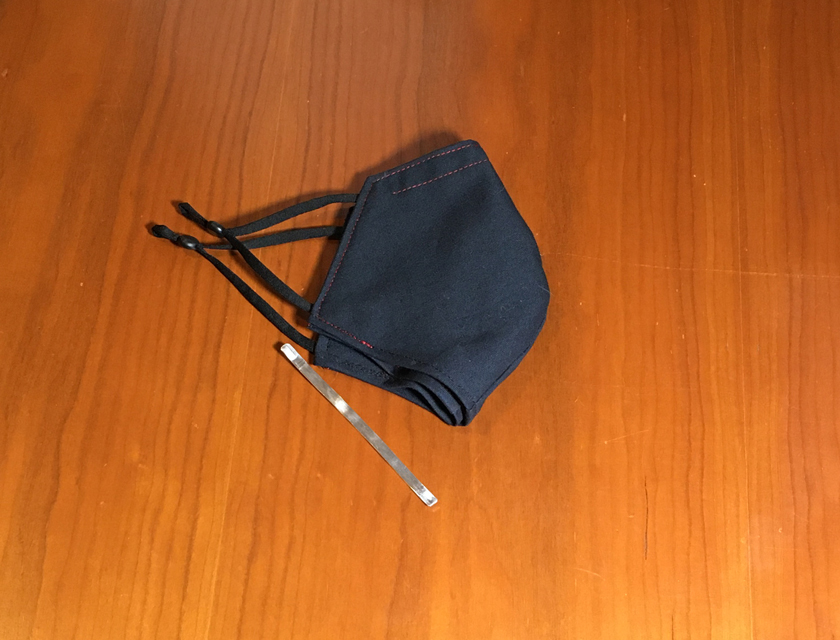
find pesky nose wire
insert wire from the inside
voila! revel in your accomplishment!
* * *
An Excessive Number of Notes:
— This mask is a medium size and fits me well. It’s a bit tight for Mr. Man (those cheekbones!) so for him I add 3/8” to the bottom seam and go from there. This extra bit of fabric is enough to cover his chin and keep the mask in place while he’s talking. If that still isn’t big enough for you, consider printing the pattern at 110%, which will give you more room all around.
— Fabric density does matter, so hold any potential candidate up to the light. If you can see individual fibers and holes between them, it’s not a great option. If it’s all you’ve got, bolster your protection with an extra layer of filter.
— Want different fabrics inside and out? Fold the paper pattern in half along the top seam line, then add 3/8” to the top seam. Cut out two pieces from your front fabric and two from the interior fabric. Stitch together at the top seam and proceed from there. You’ll have a thicker top seam (as with the original TB pattern) but it may be worth it to you if you like a smooth inner lining (Mr. Man requested this approach; some fuzzier fabrics were interfering with his Movember).
— I flip things around a lot (I was probably 30 before I realized that my goofy childhood habit of flipping things was actually a touch of dyslexia, kudos to my parents and teachers for making it work), so one thing I have to watch out for with this pattern is where to put the elastic. It can feel backward to start sewing on the right/outside of the fabric, but that’s the way to do it. Stitch away!
— On nose bridges: The first draft of this pattern added an external fabric nose bridge to the outside of the mask in the final step. It works and makes it very easy to change out the nose wire, but it does add more fabric and is a bit fiddly. By the time I finalized the pattern I’d shifted to adding one additional stitch line, centered below the top seam. If you leave a half inch or so on either side, it’s fairly easy to slip a nose wire into the resulting pocket from the inside of the mask. That’s what I do now.
with nose bridge fabric and without; guess which one is easier
— On nose wires: Of all the options I tried, a thin strip of aluminum was the best. I ordered rolls of aluminum because it was so much cheaper than the pre-cut version, but if I had to do it over again I’d go with pre-cut. Freshly cut aluminum is sharp, y’all, and sanding it down is tedious. Other options I’ve tried in descending order of effectiveness: heavy-duty floral wire in foam (effective but annoying to slide in), the industrial twist-ties from Vistaprint masks (good but not quite stiff enough), doubled-over pipe cleaners (weak), thin floral wire (very weak). You may have other options.
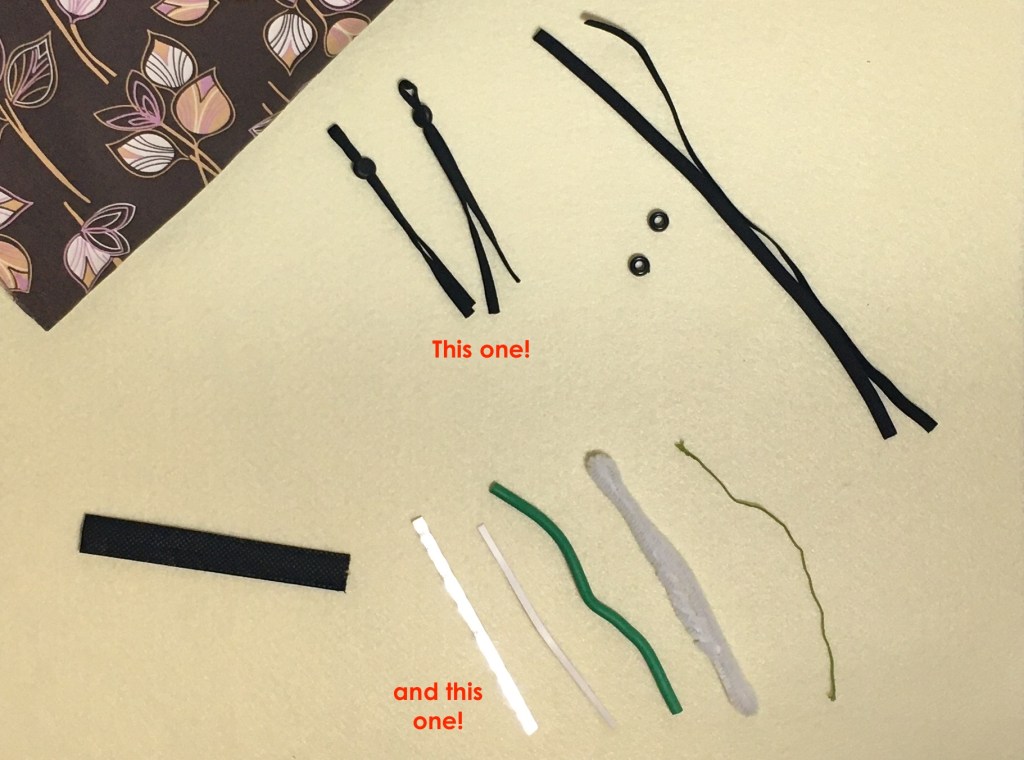
some possible wire and elastic options
— On elastic: lots of options here too, from the thick white kind harvested from an old fitted sheet to pre-cut resizable versions. I’m using the latter now because it’s faster and less annoying, but I had good luck with 6mm elastic from my local fabric store, with or without little plastic pony beads (what do ponies have to do with it, I wonder?) for sizing adjustments. (If you go with the pony beads, add an inch or so to the elastic length and tie a knot on the end to keep the bead from slipping off in the middle of Costco. Ask me how I know!)
— Is that it? Probably not, but hopefully it’s enough to get you started. If you have questions, check out the linked TB videos or let me know.
Even More Notes:
* Granted, it’s been a lot of kittens. A kindle of kittens, even! Cute as heck, but consider supporting your local animal rescue organizations; Humane Society and neutering program closures have started a wave of ferals and strays, and winter. is. coming.
** The usual caveats apply: no mask is 100% effective, fabric density matters, adding a filter helps, cover both nose and mouth while wearing, wash after wearing, social distance, wash your hands a lot, etc. Fun times, am I right?
* * *
Congratulations, you’ve worked your way through all this text! As a thank you, here’s an Inspiring Quote from someone who lived through much worse than this year and used it to create things both astonishing and beautiful.
Stay healthy, stay safe!
* * *
Obligatorily Inspiring Quote!
The world is indeed full of peril, and in it there are many dark places; but still there is much that is fair, and though in all lands love is now mingled with grief, it grows perhaps the greater.
tl;dr (even though it’s short short short!): Covid-19 a.k.a. The Coronavirus. Ugh. But we’ll get through this.
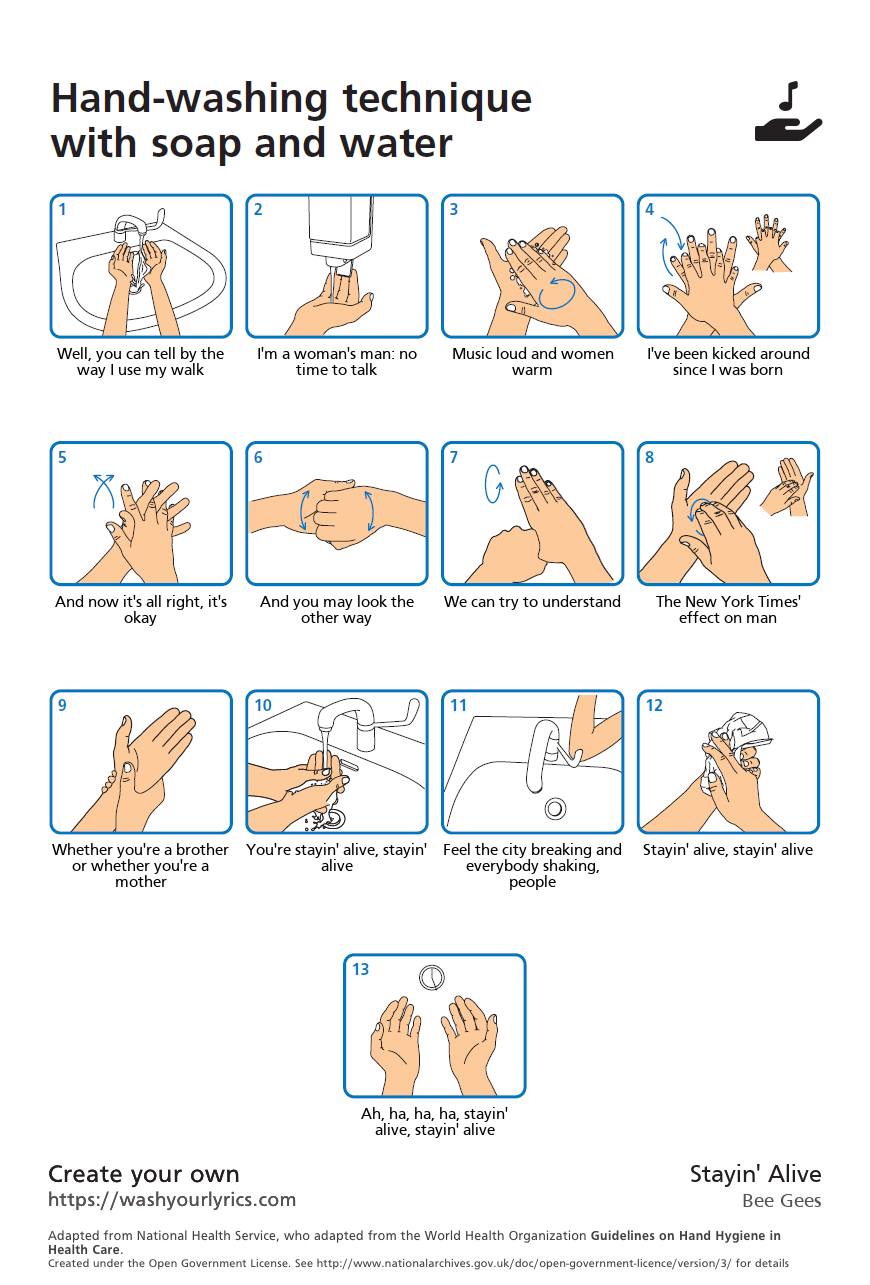
In service to the greater good, I am amplifying this genius little tool: Wash Your Lyrics.
Type in a song title and artist, come away with a custom hand-washing poster to make it easier to get through the whole… freaking… twenty!… seconds… worth of hand-washing the CDC and every other knowledgeable organization / official / healthcare professional / your mom says we all need right now. More details here, but it’s pretty straightforward.
Obviously, it’s been done before, but to get you started here’s a set of hand-washing instructions set to the world’s most obvious song choice (waiting to see stats on song selections, but I’m pretty sure I’m right):
Let me also take a moment to thank all the public servants, health care professionals and first responders working on the front lines. Stay safe, my friends!
I decided to take this year off from birthday cakes, but I did make the delicious bite-sized treats that are madeleines. Reminiscent of pound cake but more flavorful, these French cakes have been one of my favorites for years. Now I’ve got the recipe down. Good thing, because they don’t last long!
***
This is a simple recipe with terrific results. The only real surprise is the amount of chilling time, so plan ahead. Also, I was fortunate enough to inherit a set of traditional European madeleine pans, and with the liberal application of butter and flour they work well. That said, if you don’t happen to have these single-purpose pans, I’ve had decent luck making them in cupcake liners. The shape is different, of course, but the edges pick up a small flute from the liners. The darker cupcake pan made the bottoms cook a bit too fast, but cut baking time by a minute or so and it should turn out fine.
On ingredients:
I use organic unbleached all-purpose flour (thank you, Costco) but you don’t have to. I also use granulated sugar that’s been toasted to bring out a caramel flavor that’s subtle but noticeable. If you have the time to do this, I suggest making a big batch so you have extra. It’s great in everything. As a note, I toasted a batch of organic sugar but pulled it after an hour. Turns out the higher molasses content means it’s faster to melt and burn, so keep an eye on it if you go that route. Still tasty!)
On rise:
There’s also a whole debate around whether to baking powder or not to baking powder. The traditional approach is most definitely (and defiantly)not, but it’s up to you. I am still haunted by a pre-teen angel-food cake debacle (pancake, meet actual cake, also tears and a lifelong dislike of recipes that rely solely on whipped egg whites for volume). I use the baking powder. It worked well, even when I let the batter sit in the fridge for 6+ hours, and tasted fine. Just be sure your baking powder doesn’t contain aluminum.
On lemon flavor:
I like love the flavor of lemon but am not fond of chewy, waxy, dry lemon peel. I leave it out here, but if you find yourself with a nice, thin-skinned organic lemon on hand, I say use the zest. I also boosted the amount of glaze because the smaller amount in the original recipe didn’t quite stretch far enough. (I also use all lemon juice because I’m crazy like that, but the water will help it flow. Adjust as you like. Or use lime juice. Or 2T. orange concentrate, 1T+ water.)
***
And as a bonus for Mr. Man’s father and all who love writing, a taste of literature:
An exquisite pleasure had invaded my senses … And suddenly the memory revealed itself. The taste was that of the little piece of madeleine which on Sunday mornings … my aunt Léonie used to give me, dipping it first in her own cup of tea or tisane. The sight of the little madeleine had recalled nothing to my mind before I tasted it.
— Marcel Proust, À la recherche du temps perdu
I prefer lemon glaze to a tea dip but the choice is yours. Whatever you do, have fun:) Also, here’s a picture for you, showing the perfect amount of browning. It’s not my picture as I ate all my madeleines before I thought to get a shot (because delicious:).
Lemon-Glazed Madeleines Makes about 24 cookies
Adapted from this recipe (in The Sweet Life In Paris by David Lebovitz)
Cake:
3 large eggs, at room temperature
2/3 cup (130g) granulated sugar, toasted
rounded 1/8 teaspoon salt
1 1/4 cup (175g) flour
1 teaspoon baking powder (optional)
zest of one small lemon (optional)
9 tablespoons (120g) butter, melted and cooled to just above room temperature, plus additional melted butter for the molds
Glaze:
7/8 cup (175g) powdered sugar
3 T. freshly-squeezed lemon juice
1 t. water
pinch salt, to taste
Prep pans and batter:
1. Thoroughly brush the indentations of a madeleine mold with melted butter. Dust with flour, tap off any excess, and place in the fridge or freezer. (Haven’t tried this with non-stick spray because it weirds me out but I imagine that works too.)
2. In the bowl of a standing electric mixer, whip the eggs, granulated sugar, and salt for 5 minutes until frothy and thickened. (Don’t have a standing mixer? use the regular kind, because honestly.)
3. Spoon the flour and baking powder, if using, into a sifter or mesh strainer and sift over the batter in batches, using a spatula to fold in each batch of flour. (This is a little tedious but worth it.)
4. Add the optional lemon zest to the cooled butter, then dribble the butter into the batter a few spoonfuls at a time, while folding each time to incorporate the butter. Fold just until all the butter is incorporated.
5. Cover the bowl and refrigerate for at least 1 hour. (Batter can be chilled for up to 12 hours.)
Wait, then bake:
6. To bake: preheat the oven to 425 degrees.
7. Plop enough batter in the center of each indentation with enough batter which you think will fill it by 3/4’s
(you’ll have to eyeball it, but it’s not brain-surgery so don’t worry if you’re not exact; I used a rounded 1 1/2 t. cookie scoop) Do not spread it.
8. Bake for 8-9 minutes or until the cakes just feel set (10 minutes for me with baking powder; the tops will be light but the fluted base should be a light-to-medium brown). While the cakes are baking, make a glaze by stirring together the powdered sugar, lemon juice, water and salt until smooth.
9. Remove from the oven and tilt the madeleines out onto a rack. The moment they’re cool enough to handle, dip each cake in the glaze, turning them over to make sure both sides are coated and scrape off any excess with a dull knife. After dipping, rest on the rack, scalloped side up, until the cakes are cool and the glaze has firmed up.
Storage:
Glazed madeleines store well uncovered or loosely-wrapped. They can be kept in a container for up to three days, if necessary (but, yeah, they won’t last that long. Unless you are a saint. Are you a saint? I am not). These also froze fine in a plastic bag, then defrosted on the counter. Emergency madeleines for the win!
It’s summer and I’m enjoying a bit of vacation time (yay!) and what do I spot on my new Asclepias tuberosa? A monarch butterfly caterpillar!
I’ve seen a monarch or two in the neighborhood this year but not many. (Not like during my childhood down south, when my mother used to pull the car over just about anywhere to find caterpillar-rich milkweed by the side of the road.) There’s a reason why these butterflies are listed as at endangered in Ontario:(
That said, awareness of the issues around butterflies and their disappearing habitat is rising, and it’s not all bad news. I’m happy to see milkweed left to grow by the roadside, to find native milkweed varietals at the garden center, and to watch butterflies flitting in the park. If we had more sun and space I’d plant a butterfly meadow, but for now, we went with butterfly weed. Glad we did:)
As an added bonus, I also saw fireflies in the yard a couple of weeks ago for the first time north of the border:) Here’s wishing you a happy and constructive summer!


You must be logged in to post a comment.